Why do I like History Scribe? My daughter is creative and loves to sketch. If I give her a notebooking page with graphics on it, she generally feels disappointed. After all, in her mind, the funnest part is already done. Blank pages are what she prefers because she has room to draw and to write. (And I’m in hearty agreement with blank pages. After all, the more she completes herself, the more learning she is demonstrating and reinforcing.)

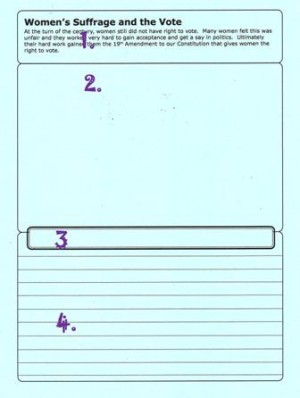
This is the anatomy of a History Scribe notebooking page:
- Heading — including a title and a short introductory blurb
- Top half – space for drawing, affixing images
- Another section for a second heading or caption to the image.
- Bottom half, lined for writing 9 lines
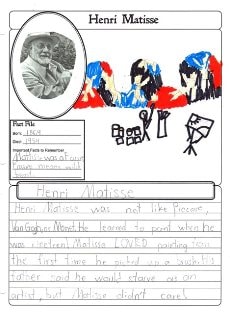
Biography pages are a bit different. Each has the person’s name for a heading at the top. The bottom half is lined for writing. The top half has empty space for creative expression plus an oval area and a small box called Fact File with some basic data to fill in.

Each set comes with some blank pages without any text at all. These are great for topics that aren’t included in the set.
So what if your child doesn’t like drawing? Actually, you can still use the blank space for affixing maps or images printed from other sources.
You may be wondering why you would want to buy a basically blank notebooking set. Three good reasons:
- If you plan your own unit studies, you may find the history scribe notebooking sets helpful for identifying key topics.
- Independent work. The top blurb gives enough introductory information for a student to get started on his own research and complete the notebooking page.
- If you use project based learning, you could give a student the table of contents and ask for a set number of pages to be completed as part of a unit of study. The student could choose his own preferred topics from the available pages.
Tips for using
Print the table of contents page for each set you buy. Keep that page with your planning notes so that you don’t forget what you have available.
Inject some variety. Print notebooking pages on colored paper or print 2 per page or 4 per page for making themed minibooks.
Examples of History Scribe pages in action:
- photos at Jimmie’s Collage (my blog)
- photo at Virtuous Foundations Home Education (a biography page)
- Smooth Stones Academy has a list correlating SOTW1 with History Scribe pages.
Where can you buy History Scribe notebooking pages? I buy them from Currclick where I can immediately download the files and begin printing them out. (There are frequent 50% to 75% off sales.)
If you prefer a CD instead of a PDF instant download, visit the Westvon Publishing homepage or History Scribe.

I like the idea of printing these four per page to make booklets. Thanks.
.-= Sandy´s last blog ..He Has Risen Indeed =-.
I just purchased these for my dc. I see us getting use out of them for years. Thanks for the tip on printing out the table of contents. Great idea!!! I love that they have a combination of things written, a nice space for illustrating, and then an area for them to give a written narration of what they have learned.
.-= Edwena´s last blog ..My Blessings =-.
Based on your review here I went to Currclick to purchase this item. They were offering the History Scribe bundled with the History Scholar at an unbelievable price. I am so glad I read your review. History Scribe is everything you said it would be plus more. I just wanted to add that the blank History Scribe pages work great for the Draw Write Now Series. Thanks for the great review.